リレーションシップの設定
Gainsight NXT
This article supports Gainsight NXT, the next evolution of the Customer Success platform. If you are using Gainsight CS Salesforce Edition, you can find supporting documentation by visiting the home page, and selecting CS > Salesforce Edition.
Not sure what your team is using? Click here.
This article describes how to set up relationships on the relationship management page.
Important: The Relationships page (Administration) has not changed, so this article is unaffected by the R360 redesign.
[overview]
Relationships is Gainsight's framework that provides the flexibility to accurately model and manage complex customer structures by creating relationship types and relationships. Building customer relationships requires more than just managing an account. These help the CSM manage each connection point (relationship) with the customer.
To view the relationship management page, go to Administration > Relationships . On this page, you can add fields, create related objects, configure relationship types and type fields, section and relationship search.
set field
Administrators can set:
● relationship fields
● Stage
● Status
relationship field
The Relationship Fields section shows all the fields of the relationship object. The object has his three types of fields:
● Standard
● System
● Custom
You can only view standard and system fields on this page, but you can create, view, edit, and delete custom fields. You can create custom fields and use them on other configuration pages for relationships.
For example :
● Custom fields can be used in relationship settings.
● You can use custom fields in related object settings.
● You can use custom fields in search settings.
To create custom fields:
- Go to the Fields tab .
- Click + Field . The Create Custom Field dialog is displayed.
- Enter the following details in the Create Custom Field dialog:
● Display Name : The display name of the custom field.
● Field name : System-defined field name with __gc suffix. This is copied from the display name by default, but can be edited if desired.
● Data Type : The data type of the field being created.
● Currency Code : This field appears when you select the Data Type as Currency Only. Select a currency code from the list.
● Default Value : The default value to insert into the field.
● Number of Decimal Places : This field appears when you select the data type as Currency, Number, or Percentage Only. Assign decimal places to the values in the field. By default, the number of decimal places assigned is 0.
● Gain Site Mapping: This field only appears if you select one of the GSID , Date , DateTime , Email , or String data types. Fields can only be mapped to standard fields of Gainsight objects. You can map the field you are creating to an appropriate standard field so that the current field value is valid for hyperlinks.
● Category: This field appears only if you select the Dropdown List or Multiselect Dropdown List data types . You have to select a category for the dropdown list. For more information on drop-down lists, see Drop-down list and Multi-select drop-down list .
● Maximum Length: This field appears only if you have selected the Rich Text Area data type . You must specify the maximum word length that this field supports.
● Description : A description of the field being created.
● Mandatory : Setting this constraint prevents the ingestion of records with null values in the field during data import. A required constraint cannot be set on a new field if data already exists in the relationship type object.
● Hidden in reports : If selected, the field will be hidden in reports.
● Calculated field : This checkbox is visible only if you have at least two fields of numeric data type. This selection allows you to create a formula using existing fields.
● Object Search List: This field appears only if you select one of the Email , String , or GS ID data types . Select the source object that populates this field .
● Field search list : When you select an object in the object reference list , the corresponding fields are displayed here. From Current Fields, select a source field that has lookup enabled.
- Click SAVE & NEW to save the current field and create another new field . This is useful for creating multiple fields in one instance.
- Click Save to save the current fields . When a field is created, it is entered in the Fields section .
- When a field is created, it is entered in the Fields section. Click Edit Field to edit the field name and decimal places. This option is only available for custom fields.
- Click Show Fields to see existing standard or system fields.
For more information on how to create new fields on objects, see Adding Custom Fields to Objects .
Notes :
● If you do not assign decimal places to numeric, currency, or percentage type fields, the field values are rounded to simple numbers.
● When importing data into fields:
○ If the user sets a default value for the field and the source record is empty/null, that default value is captured.
○ If no default value is set and the source record is empty/null, the record will be rejected if the field is marked as required.
○ Mandatory constraints can only be applied to fields with no null/empty values.
○ It is recommended not to apply mandatory constraints to newly added fields.
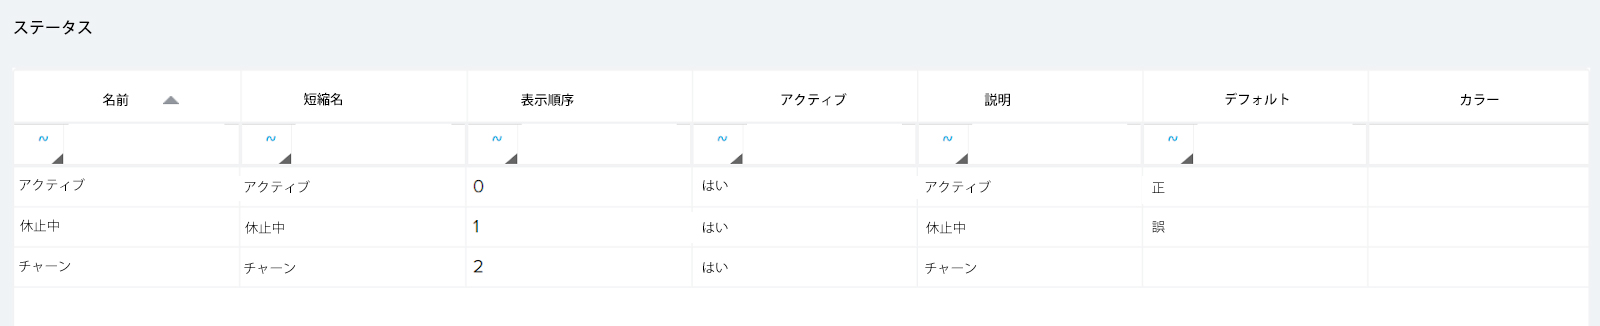
stage
Stages are used to define which lifecycle stage the customer is currently in. Gainsight's stage field provides the following standard stages by default.
● New customers
● Kick off
● Started
● Recruitment
● Will Churn
● Churn
You can only view standard stages, but you can create new custom stages or edit existing stages according to your business requirements. All of these different stage items are associated with the standard stage field dropdown on the relationship object . A user can select one of these stage items from a drop-down list when creating a relationship.
To create a custom stage:
- Go to the " Stages " section.
- Click + Stage . The Add Item dialog is displayed.
- Enter the following details in the Add Item dialog :
● Scope : Select the type of scope from one of the following options.
○ グローバル: このオプションを選択すると、作成したステージがすべてのリレーションシップタイプに関連付けられます。
○ リレーションシップ: このオプションを選択すると、作成したステージは、選択したリレーションシップタイプにのみ関連付けられます。
● 適用対象: このフィールドは、「スコープ」で「リレーションシップ」を選択した場合にのみ表示されます。ステージアイテムを適用するリレーションシップタイプを選択します。
● 名前: ステージフィールドの表示名。
● ショートネーム: これは表示名に基づいて自動的に入力されます。ショートネームを編集することもできます。
● アクティブ: ステージアイテムのステータス (アクティブ/非アクティブ) を選択します。このステージを使用する場合は、「アクティブ」を選択します。
● 色: ステージに必要な色を選択できます。
● 説明: 作成中のステージの説明。
- 「追加」をクリックして、ステージアイテムを追加します。
- ステージアイテムが作成されると、そのアイテムは [ステージ] セクションに入力されます。[フィールドを編集] をクリックしてステージアイテムを編集し、変更を加えた場合は [更新] をクリックします。
「タイプフィールドの設定」セクション
リレーションシップタイプフィールドセクションには、リレーションシップタイプオブジェクトのすべてのフィールドが表示されます。オブジェクトには次の 3 種類のフィールドがあります。
● スタンダード
● システム
● カスタム
このページでは、標準フィールドとシステムフィールドのみを表示できますが、カスタムタイプフィールドを作成、表示、編集、削除できます。カスタムタイプフィールドを作成でき、同じフィールドをリレーションシップタイプの他の設定ページで使用できます。カスタムタイプフィールドを設定するには、TYPE FIELDS タブに移動します。
ビジネス要件に応じて、カスタムのリレーションシップタイプカテゴリを作成および編集できます。これらのさまざまなカテゴリはすべて、リレーションシップタイプオブジェクトの標準のリレーションシップタイプカテゴリフィールドに関連付けられています。
カスタムリレーションシップタイプフィールドを作成するには、「リレーションシップタイプフィールド」を参照してください。
カスタム・リレーションシップ・タイプ・カテゴリを作成するには、「リレーションシップ・タイプ・カテゴリ」を参照してください。
リレーションシップタイプオブジェクトとリレーションシップタイプカテゴリの設定の詳細については、「リレーションシップタイプの設定」を参照してください。
関連オブジェクトの設定
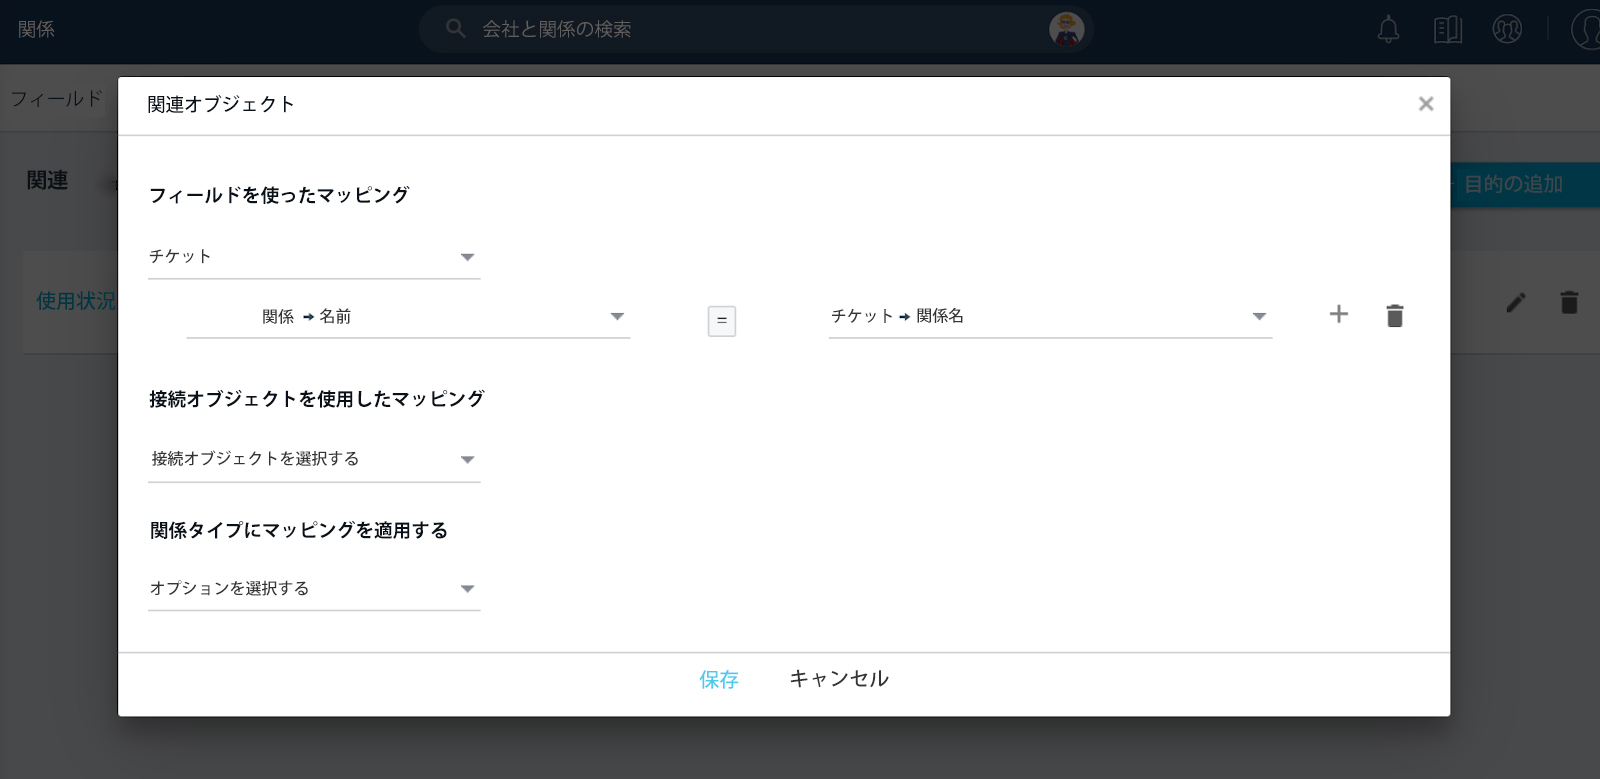
関連オブジェクトは、別のオブジェクトから関連データを取得するのに役立ち、関連するレポートをR360ページに表示できます。また、ルールエンジンで使用して、関係レベルCTAを作成したり、スコアを設定したり、サクセスプランを作成したり、その他すべての関係レベルのルールエンジンアクションを実行したりできます。
リレーションシップフィールドを関連オブジェクトのフィールドにマッピングすることで、別の Gainsight オブジェクトをリレーションシップオブジェクトに関連付けることができます。マッピングは、関連オブジェクトとそれに関連するレポートを R360 ページに追加するための前提条件です。
関連オブジェクトを追加する方法の詳細については、「関連オブジェクトをリレーションシップに設定」を参照してください。
セクションを設定
セクションページには、任意のリレーションシップレイアウトに追加できるグローバルセクションがすべて一覧表示されます。Global Sectionsはセクションライブラリです。これにより、最もよく使用されるセクションを特定の構成で作成し、すぐに利用できるようにして、複数のレイアウトで使用できます。グローバルセクションで作成したセクションは、各レイアウト設定ページの「使用可能なセクション」の「グローバル」ペインに表示されます。グローバルセクションの主な目的は、管理者の時間を節約することです。
グローバルセクションを使用するメリット:
● グローバルセクションからレイアウトにセクションを追加すると、グローバルレベルで行った変更は、各レイアウトに追加されたセクションに反映されます。
● グローバルセクションは、任意のレイアウトに追加したり、切り離したり、ビジネス要件に応じてカスタマイズしたりできます。
グローバルセクションの設定の詳細については、「関係360の詳細 (R360) ページとセクションタイプの設定」を参照してください。
リレーションシップタイプの設定
リレーションシップタイプは、CSM が RCustomer 360 のリレーションシップセクションとリレーションシップ 360 に表示する属性とレポートを定義します。また、これらのページのレイアウトも定義します。リレーションシップタイプは、顧客ごとにリレーションシップを定義するためのテンプレートと考えることができます。リレーションシップの種類は、組織が販売および管理するさまざまな製品に基づく場合もあれば、組織が販売して協力するさまざまなビジネスユニットや部門に基づく場合もあります。
リレーションシップタイプの設定の詳細については、「リレーションシップタイプの設定」を参照してください。
検索設定の設定
このページを使用して、グローバル検索からGainsight 関係を検索するための検索可能なフィールドを設定したり、グローバル検索の結果がどのように表示されるかを設定したりします。最大 4 つのフィールドを検索可能または表示するように設定できます。デフォルトでは、名前フィールドは設定に検索可能として追加されます。リレーションシップ結果のプレビューを表示して、グローバル検索からの検索結果がどのように表示されるかを確認できます。
Gainsightでは、検索パフォーマンスの低下を防ぐため、最大2つのフィールドを検索可能(切り替え)としてマークすることをお勧めしていますが、4つすべてを検索可能としてマークすることもできます。
リレーションシップフィールドを検索可能に設定すると、変更は 24 時間に 1 回適用されます。変更を即座に適用したい場合は、Sync Object 機能を使用できます。詳細については、「オブジェクトを同期」セクションを参照してください。
リレーションシップ検索の設定を構成するには:
- 「検索設定」タブに移動します。デフォルトでは、右側のペインの検索可能なフィールドセクションに [リレーションシップ名] と [リレーションシップのカンパニー名] が表示されます。
- 左側のウィンドウの [使用可能なフィールド] セクションから 1 つ以上のフィールドを検索可能なフィールドセクションに追加します。これらのフィールドは [表示フィールド] セクションに追加されます。
- 追加したフィールドのトグルスイッチをオンにして、検索可能としてマークします。検索できるようにマークできる文字列型フィールドはごくわずかです。
- 設定/ギアアイコンをクリックしてフィールドの表示名を変更し、ビジネス目的に合った名前にします。
メモ:
● 検索パフォーマンスを維持するために、検索条件に含めるフィールドは 2 つ以下にすることをお勧めします。ただし、最大 4 つのフィールドを追加できます。
● リレーションシップは名前フィールドでのみ検索できます。設定に名前以外のフィールドを追加した場合、それらのフィールドのみを表示でき、それらのフィールドとのリレーションシップを検索することはできません。
以下の画像では、「関係名」、「カンパニー ID 名」、および「CSM 名」が検索可能なフィールドとして追加されています。
検索設定を構成すると、次の図に示すように、検索バーのリレーションシップ名の下に新しく追加された検索可能なフィールドが表示されます。カンパニー名と CSM 名でリレーションシップ名で検索できるようになりました。

オブジェクトを同期
検索フィールド設定の変更は、24 時間に 1 回検索インデックスに同期されます。検索フィールド設定の変更を瞬時に同期するには、次の操作を実行してください。
Note : If you want to synchronize changes to search fields instantly, running Sync to apply the latest configuration to the search index puts extra load on your IT infrastructure.
- After selecting the relationship lookup fields, click Sync Objects . The Sync Fields window appears.
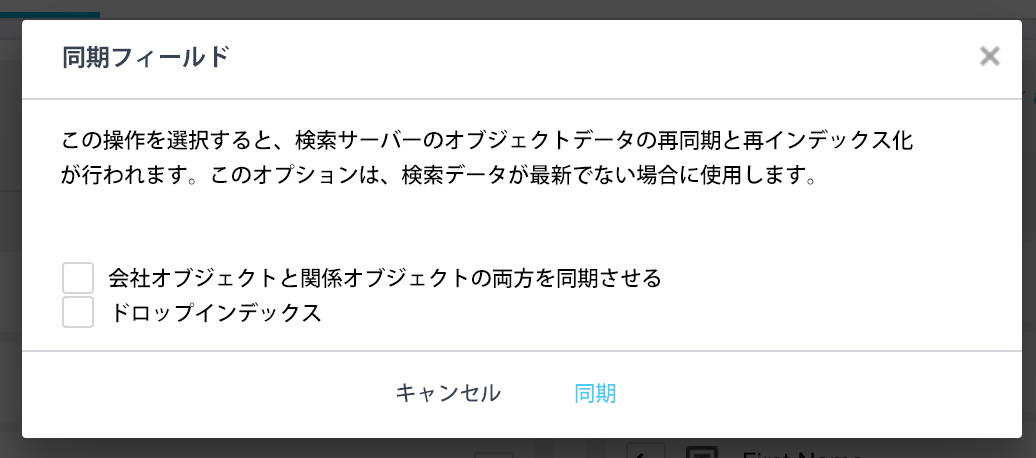
- Select the check boxes as required.
● Select the Sync both company and relationship objects checkbox to have search field changes applied immediately to both company and relationship searches from their respective search field settings .
● Select the Drop Index check box to drop the existing search index and apply a reindex. This allows you to view related relationship records from the search box by the most recent search field.
- Clicking Sync (without selecting the checkbox) will immediately apply the lookup field changes to the relationship field only. You can optionally select the checkbox before clicking SYNC .